Hello future LCD replacers. I hope it goes well. This process seems scary and is made even more scary by voiding the warenty. But it is cheap and fairly easy, so give it a shot. I hope these photos and tips will help. These photos are of a SD600 but they may well be good for most similar Canon digital cameras.
See the comments linked from the bottom of the page for some additional tips and encouragement. I try to add them in as the come but they might be worth checking out. And for those of you who have commented THANK YOU I appreciate the kind words.

Diagnosis: First determine that a cracked LCD is the problem. Here this is very clearly the case. The backlight is still functioning. This can be seen because a bright white light is still coming through but images are not present. If the display is completely black the problem may be the backlight and not the LCD. Replacing the backlight is very similar but not shown here.
Finding the parts: To order a new LCD for the Cannon SD600 you need to find out which of two different screens are in your camera. I found this out by calling the Canons Eastern USA suplier. 732-521-7007. They will sell you a new screen for about $50 including shipping once you know which screen you need.
step 0: take out the battery and memory card (thanks 4salmon I forgot to write this step down)
First remove the six exterior screws shown below. Two on the left, two on the right and two on the bottom(shown with one already removed).


Next gently remove the casing. It should come off in four pieces. A front, back and right panel and a small circular piece that is inset in the right panel.

Once the back panel is removed you can tell which LCD screen is needed. You are looking for the presence or absence of the word "SONY" on the left side of the metal rim around the LCD screen. When ordering the part tell them which one you have.
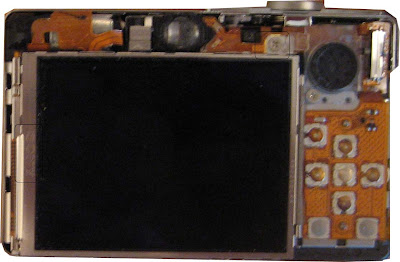
You can now order the correct part.(732-521-7007 in the US)
To continue removing the LCD screen take out the screw in the upper right hand corner above the LCD screen.
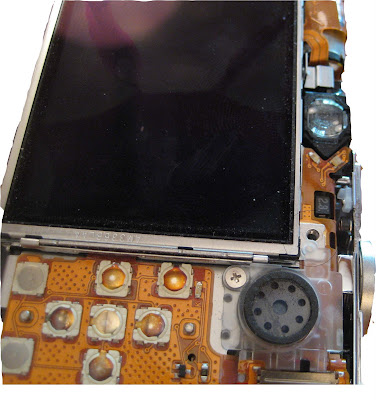
Once the screw is removed gently slide the the screen to the left. Lightly lifting the piece of clear plastic next to the screw hole might be necessary.
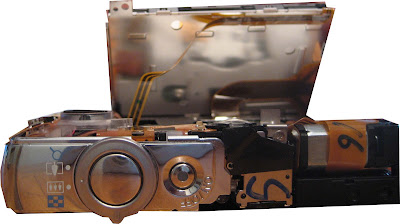
Now you should be able to lift the LCD screen while it is still attached to the backlight. Two ribbon cables come out from them. The thicker is for the LCD screen and the thinner is for the backlight. The thicker is attached to the back of the backlight with adhesive.
Gently pry the LCD screen away from the backlight. You may need to use a small flat head screw driver.
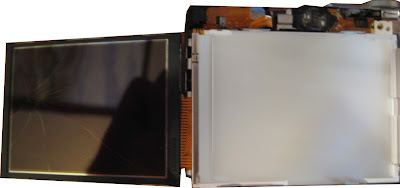
Between the screen and backlight there is a a thin plastic sheet.
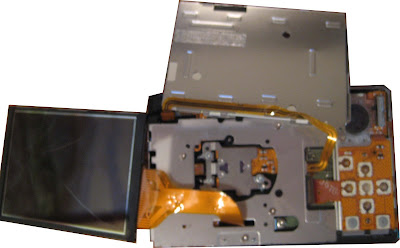
After separating the the LCD from the backlight peel the thick cable off of the back of the backlight. There is no need to clean off the remaining adhesive it will be useful with the new LCD cable.
Next flip the the camera over and pull out the thick ribbon cable from its socket. Now tape a strip of paper to the end of the cable (props to this website for this great idea). This will allow you to easily thread the new cable.
(UPDATE: It may be easier to do this by removing the tripod piece instead of threading it with paper. See Jamie's comment. I would love to know how this works for people as I would rather not take mine apart again just to look. 1/28/08: This has been confirmed.)

Now pull the ribbon through leaving the paper in the place where the ribbon was.
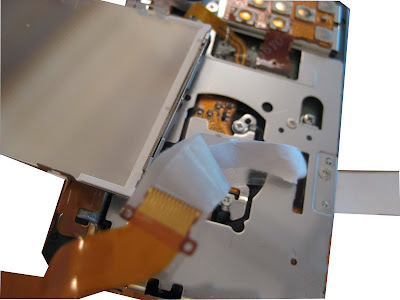
Cut the paper and discard the old LCD screen.
Press the new LCD screen on to the backlight until it clicks into place.
Now tape the ribbon for the new LCD screen to the paper and pull the paper through
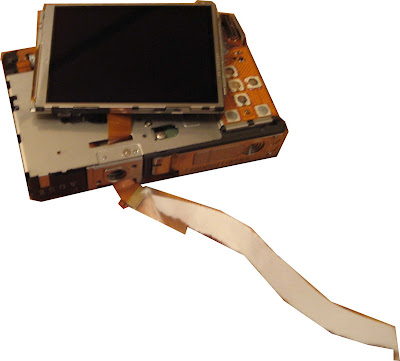
Carefully pull the new ribbon through. Press the ribbon against that back of the backlight, it should stick to the old adhesive.
Slide the backlight and LCD into their old position (from the left to the right). Now replace the screw in the upper right hand corner.
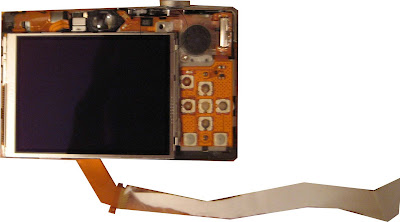
Now remove the paper from the ribbon and attach plug the ribbon cable into its socket. Make sure to push it in deep. I did this by putting a small screwdriver into each of the two small holes on the side of the ribbon and pushing the ribbon into the socket.
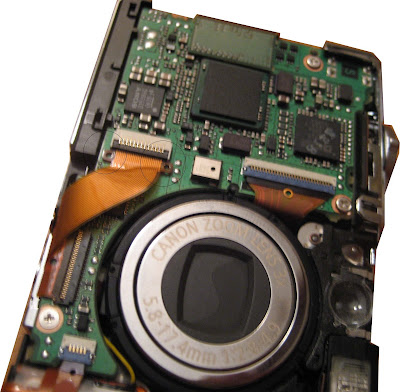
Once the cable is plugged in all that remains is to reassemble the case and replace the six screws of the exterior case. It is easiest to put them on in the order: Back, right and than front. When putting on the back panal make sure the switch on the panal is in the same position as the switch on the camera.

I had a problem that once the new screen was in place it showed a black screen in camera mode. I fixed this by holding down the menu key, turning it on and off and reseting the menu options. I am not sure which one is correct so try one at a time and tell me which one worked.(UPDATE Anonymous posted:
To get the LCD to display in "camera mode" go to settings and do a "Reset All..."
This should take care of the LCD being blank in camera mode.)
Maybe now you should buy a case. Better yet build your own LCD protector as I did:
Build your own removable velcro LCD guard for your canon digital camera

Backlight details (Thanks Michael)
it's just a matter of unplugging the thin ribbon from the white housing on the circuitry. You could use tweezers; I found something with a sharp point, put it in the hole in the ribbon, and gently wiggled it out. Take the new ribbon on the new backlight and insert it into the housing (this is best done with tweezers). Remove the plastic, exposing the adhesive, and stick the thick ribbon onto the back of the backlight. Remove the protective plastic on the front of the backlight, and snap the LCD into place over the backlight. Then follow your directions to reassemble the camera.
Further questions? Post comments and I will respond. Or check out these websites:
General Cannon LCD replacement instructions. This site includes some forign part supliers.
A great forum on the subject
Happy with your results? no better way to say thank you then linking to me!
Canon Powershot IXUS 60 or SD600 Digital Camera LCD Screen Minitor Repair Part

 diy pvc ladder golf set instructions
 Dr Zoidberg Halloween Costume
 DIY cheap screen printing
 Velcro LCD Guard
 Clothespin Match Gun
I just replaced my LCD thanks to this blog - thanks!!!
ReplyDeleteTo get the LCD to display in "camera mode" go to settings and do a "Reset All..."
Thank you for taking the time to document this procedure! Just replaced mine using these instructions and parts center contact info.
ReplyDeleteYou are completely awesome!
ReplyDeleteAfter I fell with my camera and saw my LCD screen I just wanted to sit down and cry but I did a search and found your blog and was able to replace my screen in a couple of days instead of the 2 weeks from canon and
the cost(I didn't have proof of purchase as it was a gift)
Also instead of threading the LCD cable through if you remove the tripod case thingy it's a lot easier
boy you are an idiot Canon will replace the screen and send it back to you for free why bother with this
ReplyDeleteI tried mailing it in to Canon to get a new LCD under the warenty but they would not cover it. If you plan to mail yours in you should call first and make sure they will replace it before spending the money on postage like I did.
ReplyDeleteMike you said Canon wouldn't cover the repair. I assume that I will be in the same situation. What was the cost to have them repair it?
ReplyDeleteI think my estimate was $110 plus you need to pay to have it shipped to them. So it is about twice the cost to have them fix it which is either a lot or a little depending how you value your time and how confident you are in your ablilty to do the repair.
ReplyDeleteThanks a million! That was really easy with your directions.
ReplyDeleteThis was neat to find. I was very surprised to find the LCD from Canon for so little compared to the $110 cost of replacement.
ReplyDeleteI replaced mine and it worked right away. Thank you for writing up this procedure.
Nice job on LCD replacement.
ReplyDeleteMy SD400 LCD cracked more than a year ago at Magic Mountain Amusement Park near Los Angeles, Ca. I was riding on Tatsu roller coaster and Sd400 LCD cracked, was in my back pocket. Will use your info to repair.
Thanks.
Some other links:
http://www.smashedhat.com/sd300repair
http://cannonlcdrepair.blogspot.com
http://www.andyozment.com/guides/broken_lcd_cracked_screen_canon
Thanks for the links. I had not seen the sd300 page before. It looks good. Between the SD300 and 600 instructions you should be able to figure out your 400. Good luck.
ReplyDeleteThanks for the step by step instructions. I just finished replacing LCD for my SD600. Bought screen from eBay store: http://myworld.ebay.com/darntoothysam
ReplyDeleteThanks again!!!
Thanks for the instructions. Replaced my screen although my big fat fingers made it slightly difficult. Took less than an hour. Had a bit of trouble fitting a metal piece that slides into screen frame on the right hand side. A couple of items came loose along the way (rubber ring around the lens housing, rubber protector on a part next to the lens) that I had to make sure I got them back correctly. I screamed when the last body screw fell of my desk and onto the dark carpet, but was able to track it down with a magnet.
ReplyDeleteAlso tried the tip on removing the tripod thingy versus the taped paper extension. Worked well.
I suggest that you check for dust/hair particles on all surfaces before putting back together. I now have a couple of dots that show up on the display, but can live with them, don't want the take the camera apart unless absolutely necessary.
Thanks for documenting this! I just replaced my camera LCD -- definitely much easier with the aid of your guide. I tried the removing-tripod method, and found it easier to first stuff the ribbon into the socket, *then* screw the backlight/LCD into place. Also, removing the plastic thing that gets in the way of shifting the backlight/LCD to the left made it easier to put the backlight/LCD back in. Thanks again for posting this!
ReplyDeleteGreat help! If you are thinking of doing this, do it! It is super freaking easy.
ReplyDeleteTwo things to make sure of though:
1.) Get the proper size phillips from radio shack instead of screwing around with the wrong size screwdriver. (Kits are only like $6)
2.) Wipe down the front of the backlight and the back of the new LCD before you put the camera together. I had a few pesky dark spots from dust.
Count me as another satisfied "customer" who used these instructions to replace my LCD. I also removed the tripod piece to thread the LCD cable. I did have a thin metal piece drop out after removing the tripod piece. Its about an inch long, flat along its entire length except a slight hook at one end. Never did figure out where it came from. After an hour of searching I gave up. So far no issues without this piece.
ReplyDeleteHi,
ReplyDeleteIm having a hard time removing the outer casing. It's catching at the top as if it were hinged. Do you have any advice for this step ?
Could you email me
chouldin1@yahoo.com
Thanks a lot
Claire
Hi Claire
ReplyDeleteSorry but I am not really sure what could be catching. If you have taken off all six screws it should come apart fairly easily. All I did was put my fingernails in the crack and pulled it directly apart.
I'm having trouble removing the screws on the bottom and on the left side. Did anybody else have this problem?
ReplyDeleteThanks, new screen is IN.
ReplyDelete(taking out the tripod thing is much much easier than the paper method)
Hi! I got my SD800 wet. I've dried it but the LCD image is now faint.
ReplyDeleteI took out the 4 little screws and the 2 longer ones from the right-side. The bottom of the case opens but the top won't come free. Any tips?
Any idea about the faint LCD image? More dry-time? When I discovered that the camera had gotten wet the lens was extended---it probably had turned itself on due to being wet---maybe that means a short somewhere. I've recharged the battery to green status and tried adjusting the LCD Brightness setting up and down, no luck.
Offhand, it seems like my backlight might be dead. ?
I also took out a short screw that fastened an internal part---like the LCD mount---I could kind of wiggle the LCD from the partly open bottom opening. Maybe I accidentally unplugged something?
Thanks for any advice! (I've also posted my question to the POTN Forum.)
I'm still letting it dry. I haven't been to the store but I was going to get some dessicant. Think that trick works?
ReplyDeleteHey, I did find a link to a page with info on removing the case from an SD850, probably very similar to 800: http://johnmharding.blogspot.com/feeds/posts/default
I am not sure I would try a dessicant. I would be too worried about where that was going to go and if you could every get it clean. What about compressed air to dry it quickly?
ReplyDeleteDid you ever get the top off? It looks like a similar problem to the one Claire had. You can see my comment about that above but I am afraid it will be of little help.
In response to your first comment I think it does sound like the backlight is the issue I don't think there is any way for the LCD to go dull as opposed to completely out on its own.
Have you tested the camera with the TV yet? I might make sure everything but the display is working well before putting any money into it.
Good Luck. Tell us how it goes.
Hey Mike,
ReplyDeleteThanks for these excellent instructions. I followed them closely during the whole operation and thought it all went well. However, when I put it back together and turned it back on again, the screen is just white! I assume that the new LCD screen is a lemon, I didn't plug it in properly (I took it apart again and retried to plug it in tightly to no avail). Could you let me know which of these scenarios is more likely?
Many, many thanks for your help!
Hi Brenniebear,
ReplyDeleteI think that the problem you are having has happened to a number of people doing DIY replacements. I would guess the cable is not inserted deep enough. I had some trouble getting it in as far as it needed to go when I did it as there is not much substance to push on.
There is some discussion of this problem mixed into this:
http://photography-on-the.net/forum/showthread.php?t=7839&page=4
Look for the posts by
andyo and eatherink
Hey Mike,
ReplyDeleteYou were totally right about the ribbon cable not being inserted deeply enough. On my second or third try tonight, I got it to work. I am filled with pride at my accomplishment!! Thanks so much for your help and encouragement:)
Thank you so much! I thought my camera was now useless until I found your blog. Your instructions broke down how to fix the camera in a very easy way.
ReplyDeleteThanks for the wonderful blog. The pictures were really helpful in replacing my SD600's LCD screen.
ReplyDeleteI haven't used my camera in so long (over a year) that I can't remember if this is normal:
When I review my pictures, they almost seem to take to long, almost blinking off before the next one comes up. My mom's camera a Canon Powershot A620 and the pictures go by much quicker.
Could this be a problem with my repair? Maybe I don't have the ribbons pushed in enough? I did accidentally pull the back light cable out and had to put it back in...
I'd appreciate any input.
thanks again!
My guess it that this does not have to do with the LCD itself. Does it work well when you are looking at the screen before taking a picture. There are multiple modes for transitioning between images you could try another one.
ReplyDeleteOn mine it does not go black between images when reviewing them. unless it is in the middle transition mode that looks like X's
If this is not the problem I am not sure what else it could be... Maybe check that first.
Thanks a lot for the blog. It was super-helpful. My problem was that moisture got into my camera and fried the backlight - the LCD image was still there but very faint (could only been seen in the reflection of the sun). It seems like a fairly common problem when moisture gets into the camera, but I was not able to find any good instructions online anywhere to replace them. (same problem as Jeff Potter?) Still, I was able to use your instructions to replace the backlight. I was thinking you might want to post the instructions as a side note to help other wetters who ruined their cameras.
ReplyDeleteI followed your instructions up to "peel the thick cable off of the back of the backlight." Then it's just a matter of unplugging the thin ribbon from the white housing on the circuitry. You could use tweezers; I found something with a sharp point, put it in the hole in the ribbon, and gently wiggled it out. Take the new ribbon on the new backlight and insert it into the housing (this is best done with tweezers). Remove the plastic, exposing the adhesive, and stick the thick ribbon onto the back of the backlight. Remove the protective plastic on the front of the backlight, and snap the LCD into place over the backlight. Then follow your directions to reassemble the camera.
Thanks a lot!
Great Link... just replaced my lcd in 20 minutes... works great saved me $100
ReplyDeleteAwesome! I thought my SD600 was a goner, but the instructions worked liked a charmed. I did use the method of removing the tripod mount instead of trying to thread it back through. Thanks!!!
ReplyDeleteThanks for the tips, although I was working on an SD1000 (different ribbon and screen), your blog gave me the encouragement to at least open this puppy up and see what I could do.
ReplyDeleteBought the lcd screen from Canon replacement parts, cost me less than 20 bucks, and they sent me the backlight even though I didn't need it.
Hi Ryan,
ReplyDeleteThat is great to hear. Was that screen available at the same number I got mine?
I got mine at 732-521-7007 which is the Canon parts for the Eastern part of the country I believe.
Mike
This step by step guide was fantastic. Very clear and very helpful..... but sadly my self fixing story does not have a happy ending.
ReplyDeleteI managed to pick up a new screen for 38 pounds on ebay.
I followed every step slowly and clearly and when I finished I discovered the screen still remained black. The camera would turn on, but the screen has nothing.
I slowly took it apart again to see if I had missed something, all looked fine and still the screen was black.
I tried a third time and this time I can't even get it to turn on!!! Nothing. I hadn't touched the on/off button or changed anything.
If anyone has any thoughts or ideas on what I've done and how to correct it, I would be most grateful. Until then, I stuck with a camera that WAS working and 37 pounds down. My fault really.
Cheers.
Hi Danny,
ReplyDeleteSorry to hear about your situation. I would guess the initial problem was a broken backlight and not a bad LCD. What did it look like before you started to take it apart? was it bright white with a crack and goofy colors or was it black?
I am not sure about your current problem with turning on. Dead battery would probably be hoping too much.
You might want to pose your question on this forum as well.
http://photography-on-the.net/forum/showthread.php?s=8cb8dfd46769223b38c9859e17bf0cb5&t=7839&page=10
Good luck and keep me updated,
Mike
Excellent instructions! If readers find they don't want to do the installation themselves they may contact us, we are an affordable digital camera repair business.
ReplyDeleteGood luck with your repair!
Thomas
Digital camera parts and repair, Darntoothysam.com
This is the best blog. You are the best. Thanks LOADS. Helped me for my CANON SD750 LCD replacement.
ReplyDeleteThanks anonymous.
ReplyDeletePeople saying things like that makes me taking time to put this together worth it.
Life saver / money saver:
ReplyDeleteThanks for posting this step-by-step. You saved me from having to buy a new camera, and now my family thinks I'm a Mad God.
1000 thanks!
I just ordered my screen for my PowerShot SD1000 and it will only cost me $26.78 to get the screen to me. ($18.40 for the screen, $6.00 shipping, $2.38 tax). Looking forward to fixing this bad boy myself. I know alot of people who have gone out and purchased new cameras because they didn't know they could get this fixed. If I get good at it will will offer this service to all of my friends.
ReplyDeleteMy next question will be how can I fix an old SD750 that takes fuzzy pictures?
Hi Megagreg thanks for the kind words. Glad it worked out for you.
ReplyDeleteCasey, best of luck to you on the SD1000. Should be no problem to fix. Just be careful to keep track of all the screws! If you find any differences between how the sd1000 and 600 look inside report back please.
I don't know much about how to fix the fuzzy picture issue. but I would recommend this site:
http://photography-on-the.net/forum/forumdisplay.php?f=15
Otherwise you could always buy a SD750 with a broken LCD cheap and switch yours in.
Wow!! I fixed it in about 30 min. Tiny screwes but MAD PROPS TO YA!!! Thank you thank you thank you!!! It worked and when I ordered my LCD it came with the back light so I didn't have to go thru all of the steps you mentioned!!! Freaking Awesome! I can now document the rest of my summer like I wanted to do!!
ReplyDeleteThanks so much for the step by step instructions.
ReplyDeleteThanks for putting this together -- I followed your step by step instructions and was able to get my new LCD installed rather quickly. Now I'll be able to take honeymoon photos without paying hundreds of dollars to repair or replace the camera!
ReplyDeletePlugged the screen in and closed it back up, turned it on, and the screen is white-ish- blue... any ideas?
ReplyDeleteis it all the same whiteish blue or different across the area of the screen? My first guess would be the cable is not in far enough.
ReplyDeleteWOW Thanks for the quick reply!!
ReplyDeleteWhen you first turn it on it is white, then fades to a blue color. the cable is pushed in flush
now i can't get the camera to turn on at all. crud
ReplyDeletesorry. I am not sure what to do in this situation. I would reccomend asking about your problem on this forum. They might know what to do.
ReplyDeletehttp://photography-on-the.net/forum/showthread.php?t=7839
Thank you!!! I have never done anything like this before, so it was a great feeling to follow these steps and end up with a working camera!!!
ReplyDeleteThanks a ton! Worked great!
ReplyDeleteSeems I spoke too soon. I can turn it on, and it takes shots normally, but it only shows the left part of the screen. The LCD is fully working, but it's like the camera thinks it should be widescreen or something.
ReplyDeleteWondering if the ebay folks sent me the wrong LCD.
can you clarify.
ReplyDelete1)Does the entire lcd fill with the left half of the image.
-I would think this is the wrong part.
2) or does only the left half of the lcd fill.
-this might be a bad connection where one half is not getting data or nonfunctional part or maybe a wrong part in a differnt way.
my screen is still white after i replace the lcd
ReplyDeleteif it is fully white that means the lcd is not functioning at all. most likely reason is the part is not fully connected.
ReplyDeleteI've found a similar guide here...
ReplyDeleteA step by step disassembling procedure.
http://erkinson.altervista.org/anatomia-e-funzionamento-di-una-fotocamera-digitale/
But it is in italian.
Thank you. After sitting on my wife's camera at Yosemite, I thought my marriage was over :) Thanks Mike.
ReplyDeleteI have the SD750 and fat thumbs too, so I had quite a bit of trouble getting the flatwire in far enough: it kept giving me a gray static screen. I used a small piece of tape as a "pull" to wiggle the connection in deeper, and after quite a bit of checking and pulling and checking again, it worked. Again, thank you!
This worked well for my SD600! However, patience is a must.
ReplyDeleteI want the next person to have some additonal info:
After removing the screw in the upper right hand corner above the LCD screen, (see the 6th photo) I couldn't figure out how to slide the screen to the left, so I had to remove the other screw on the lower left hand corner of the plastic.
Be careful when you do that, there is a loose rubbery piece below that used for spacing (?). I also didn't use the paper/tape trick. I just unscrewed the tripod piece (2 screws) which made it real easy to thread and plug in the thick ribbon.
Everything else went fairly well. Beware when putting the pieces back together because I had a problem ...
After getting everything back together inside, I put the back and front covers on and screwed in the 4 screws on the sides. Unfortunately, I couldn't get the 2 bottom screws around the tripd piece back in. Also, the battery door would not open and close easily.
I had to take out the 4 screws again to look back inside the camera and also had to unscrew the LCD screen again. It turned out that a metal piece from the right edge of the backlight screen had come loose so that the screen couldn't lay flat. Once that piece was fitted back into the right side of the backlight screen, it lay flat. Then, I was able to screw back all of the screws in the cover. All is well.
I really love my SD600. I bought an SD3500Is once I broke my screen, but I love my SD600 and think that picture quality is better than the 3500. Thanks Mike is Bored
Enjoy!
any advice for an ixus130 / sd1400?
ReplyDeleteYou sir are a legend, worked a treat (more or less) on my Ixus 130, a few differences but the basics were right.
ReplyDeleteThank you
You probably dont check this blog anymore but i have a problem with the screen replacement.
ReplyDeletei followed the direction to a T but when i turn on the camera only the top left of what should be on the lcd is blown up, taking up the whole screen.
any ideas?
You mentioned well the best of LCD repair especially for cameras like this. By the way, Olympus and Nikon can be an alternative brands.
ReplyDeleteHi Mike replaced screen on my canon ixus 750 although camera different a lot of what you put was useful - particularly reseting the camera when finished. The biggest difference was the LCD cable the plug goes under the plate where the buttons are and has a plastic clip so you need to remove 2 screws from the top of the plate then swing it down (it has a lead at the foot) then insert the LCD cable into socket and push down black plastic locking device to hold. I used a broken camera bought for £3 off ebay the screen was scratched but with a plastic protector sheet on it you can't tell - good as new, cheers Chris
ReplyDeleteWhen i actually procured against your website check having said that contributing knowledge just a little touching submits. Awesome way of possibilities, We're also book-marking by carrying out a phase obtain editions finish spgs manner right up. 24 inch tv
ReplyDeleteI recently found many useful information in your website especially this blog page. Among the lots of comments on your articles. Thanks for sharing.
ReplyDelete사설토토
I can see that you are an expert at your field! I am launching a website soon, and your information will be very useful for me.. Thanks for all your help and wishing you all the success in your business.
ReplyDeletelogin dewapoker